- Home
- DPF Parts Direct Blog
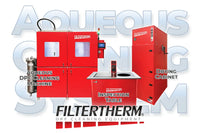
- The Filtertherm® Aqueous DPF Cleaning Machine Operational Video
The Filtertherm® Aqueous DPF Cleaning Machine Operational Video

Steve Hoke
Published on
View Video Transcript
Steve Stratton
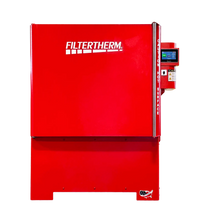
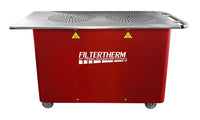
Hello everyone. Steve Stratton here, Redline Emissions Products. Today we are doing a quick operational video and an instructional video on how to set up and use the Filtertherm Aqueous DPF cleaning machine. This cleaning machine can clean on highway, heavy duty DPFs, light, medium duty DPFs, as well as off highway DPFs. Today we're going to put this thing through its paces. We're going to clean on highway heavy duty DPF and DOC as well as a light medium duty DPF. This is the Filtertherm control panel for the Aqueous DPF cleaning machine. Here's a quick overview of what the buttons do, what the lights are telling us, what's going on with this machine. We have the main power on off switch. That is the main power disconnect for the machine. We have the cleaning cycle. There's a normal cycle and a light cycle. The normal cycle's going to be for your on highway heavy duty filters or your heavy loaded light, medium duty, or off highway DPFs.
Depending on the type of filter, if it's heavy loaded with soot, that's going to tell us what type of cycle we're going to run. The normal cleaning is a longer cycle than the light cycle. Okay. We have the buzzer indicator. That's going to allow you to turn the buzzer on and off, depending on whether or not you're near the machine working or if you're working away from it and you want that audible tone to help you get back to that machine when the cycle's complete. We have the cycle indicators. Is the cycle done? Is it running or has it stopped? Okay, we have the start button and we have the stop button. The start button's going to start the cycle. The stop button is going to stop a cycle or pause a cycle. If you press the stop button once, it will pause the cycle. If you press it twice, it will restart the machine back to zero.
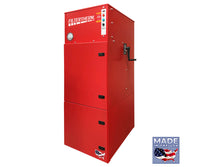
So it will allow you to adjust some of your parameters. We have three lights. On the right side, the service required light, the clean DPF light, and the network status light. The network status light is going to light up green when you're communicating with the internet. This machine, when you have technical difficulties or you need help with troubleshooting, it has wifi capabilities or ethernet capabilities. So a tech support representative could log into the machine and help you diagnose any issues over the phone and via internet. The service required light and the clean filter lights are going to come on when the system sees that the restriction is high in the filtration system. Every DPF that gets cleaned in this machine sees roughly 600 gallons of water. That's a lot of water. That means this filtration system's working pretty hard. So when the filters do load and it's time to service the machine, it's going to give us an indicator.
Number one, it's going to turn on the clean filters light. That's telling us it's just restriction. Time to clean the DPF. It's also going to turn on the service required light telling us clean the filters and it is service that's required. Once those lights come on, service the machine, service the filters. Down at the bottom of the screen display, we have the clean filters light. We'll press that clean filters button, and that will reset the machine. It will allow it to continue its cycle and move on. On this side, we have the supply tank full indicator, supply tank low indicator. Every DPF that gets pulled out of the machine loses about a gallon to two gallons of water. So over time, you will see a reduction in water. So we want to make sure that we monitor how much water's being removed from the machine via the water level indicator on the clean tank.
And the clean tank is located again at the back of the machine. Down below that, we have our filter diameters screen. The filter diameters that this machine can handle range from five inches in diameter all the way up to 20 inches in diameter. Depending on what cycle you've selected, the light cycle or the normal cycle, it's going to determine how long it takes to clean it. So a 20 inch filter on normal cycle is going to take longer than a 20 inch filter on a light cycle. So be mindful of that. You can simply increase and decrease the diameter of the filter by pushing the buttons. The green button is increase, the red button is decrease. You're going to select that once you've measured the filter and you've placed it under the wash nozzle. Just below the filter diameter tab is the mode. This machine will allow you to clean all three types of filters, light, medium duty, heavy duty, and off highway pieces of equipment.
So you can clean open face filters, and you can clean closed faced DPFs and DOCs as well. So those off highway pieces of equipment or the light, medium duty truck application, you can clean them at the same time, and it's very simple. The standard mode is for open face DPS and DOCs. Auxiliary mode moves the wash nozzle out of the way and allows you to remove the hose so you can connect to those closed face filters, and it's flip of a switch. Once the cycles stopped when it's in the stopped mode, simply change the indicator and you're ready to move on.
All right. So the Filtertherm Aqueous machine services a wide range in DPS light, medium duty, heavy duty, and off highway. In order for this machine to be able to accommodate all those filters, we're going to need some adapters. The adapter package the Filtertherm has will allow you to clean closed face filters ranging from three inches in diameter, all the way up to five inches. What you'll do is pick the adapter that best suits your needs, insert it into the DOC, DPF and tighten it down. So with odd shape DOCs and DPFs, in order for us to be able to service those DOCs and DPFs, we need to be able to have a nice flat level surface inside the machine below the wash nozzle. Filtertherm's adapter plate will allow us to set those side inlet, side outlet DOCs or SCR catalyst flat on a level surface so we can get a good clean surface area of those particular filters.
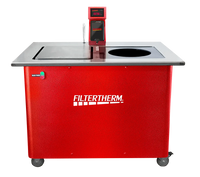
All right, guys. So we got the Aqueous machine open. We are ready to start the process for cleaning a heavy duty DPF. We have our heavy duty DPF in the machine. There's a few things we need to think about before we start the process. On the right hand side of the machine, we have the pre-soak side. The pre-soak side is where we're going to place the DPF with the flat flange down. We're going to plug the sensor buns before we place the filter in there. You can service multiple filters at a time, so you can pre-soak a couple at a time, place them again with the flat flange down on top of the rubber mat. Once you've done that, every DPF that we service is going to have four ounces of surfactant added to the filter.
The surfactant comes from the tank underneath. There's a surfactant container underneath. Each pump from the container is one ounce of surfactant, so four pumps equals four ounces. Every DPF is going to see four ounces of surfactant. So once we've added our surfactant, we're going to add water. Water's going to come from the wash nozzle, the wash nozzles attached to the clean tank. So we're going to take the wash nozzle, fill it with water. Here we go.
Okay. So now that our filter's soaked, we need to move our filter from the soaking station to the wash station. We're going to do that by pulling back on the filter, letting the water drain to the rear of the machine, making sure that the water, if you push it away, the water could come over the front and you get soaked. We want to be careful not to do that. Pull the filter back, let the water run out, and we're going to move the filter to the wash basin. When we move the filter to the wash basin, we're going to place the filter with the dirty side down or inlet side of the DPF facing down, and the outlet side or clean side facing up towards the wash nozzle.
Attached to the wash nozzle at the back of the machine is a laser guided cross hairs. We're going to center the filter to the cross hairs. Okay, we'll take a ruler, take a tape measure, whatever you got, and measure the diameter of the filter. Once we've measured the diameter of the filter, we're going to set that to the center of the cross hair. Okay. Once we've centered the filter under the laser, now we're going to lower the wash nozzle to about a half inch to three quarters of an inch away from the face of the DPF. This particular filter measures nine and a half inches. So once we lower it down, we're ready to close the doors and start the cleaning process.
We'll set our filter to nine and a half inches. We'll press start. All right, cool. So the cleaning process is complete. We've gone through the first stages. We've soaked our filter. We've allowed our filters to soak for 10 minutes. We moved our filter to the wash basin. We've washed it. Our green light is on telling us that our cycle has completed. Now let's go ahead and take this filter out of the wash cycle. Finish up the process before it goes into the dryer. So we'll open up the doors, raise the wash nozzle up out of the way. Lay the filter over on its side, lay the filter over on its side, let it finish draining out. We'll take our clean wash wand. We're going to wash through the filter, and we're going to check as we're going. We're checking for soot, spots we missed. Maybe there's a couple sections that need a little bit more cleaning. We're going to look to see what's coming out. Is it dark, sooty? Is it clean, clear? Let's see what's going on. So we'll rinse it.
During this process, during this part of the process, if you find a section of the filter that is still blowing, still has a little bit of soot coming out, feel free to take your time and rinse that out the rest of the way. The filter is clean however, sometimes very dirty filters, you will find some sections where there's a little soot left over, but that's essentially it. From here, we're going to let it drain a little bit, and we're going to go into the dryer.
All right, so now that we've cleaned a heavy duty DPF, let's move on to the light, medium duty. We're going to do this in a similar fashion. There's a couple things that are going to be different, but for the most part, it's the same. We'll take the DPF, we'll place it on the mat with a flat flange down, and we will plug the bones. Okay, place it on the mat with a flat flange down, and we're going to add four ounces of the DPF surfactant. Again, the surfactant is located in the bottom chamber. Each pump of surfactant equals one ounce, so four pumps is four ounces. And we're ready to go into the DPF. So we're going to take that surfactant, put it into the DPF, and then we will top off the DPF with water. We'll let that filter sit roughly 10 minutes, and then we'll move on. Here we go.
After the filter soaking cycle's completed, so 10 minutes has passed, 10, 15 minutes, whichever you prefer. After the 10 minutes has passed, we're going to pull the filter back towards us so the water drains to the rear of the machine, not pushing it forward so that it doesn't come over the front. So you want to be mindful of that. Again, there's going to be a couple things that are different. We're still going to wash from the outlet to the inlet. So now what we need to do is lay the filter down, install the reducer fitting or the connection, and connect the hose.
Now that the filter's been pre-soaked and it's drained, we've installed our adapter. What we need to do now is disconnect the wash nozzle from the X Y axis and attach it to the DPF. Make sure to tightly secure the connections. Once the filter's connected, close the doors and we're ready to start our cycle. The one thing to keep in mind with the light, medium duty DPF is again, the filter mode. You can't wash the light, medium duty filter when it's not in auxiliary mode. You need to flip the switch to auxiliary in order to start the auxiliary mode filter cleaning process. We're in auxiliary mode, and we'll hit the start button.
With most closed face DPFs, it's really difficult to determine whether or not those DPFs are completely clean. So we want to be mindful of how much soot is coming out at the end of the process. If you're not sure, simply start the process over again and see what's coming out. You can always stop the cycle at any time. Okay, so we washed the heavy duty DPF. We've washed a light, medium duty DPF. Now let's move on to a DOC or a flow-through device like an SCR catalyst. So DOC or an SCR system. The DOC or the SCR doesn't necessarily need the pre-soak. It's a flow through device, meaning it's the exhaust, everything flows straight through it. So all we really need to do is rinse these things out. The tank in the back of the machine, our clean water tank over time builds up with a loading of surfactant.
Every DPF we wash, we add four ounces. So you can imagine how much surfactant is being added into the 100 gallons for each cleaning. So we're not going to add surfactant to the DOC or the SCR catalyst. All we're going to do is simply place it under the wash nozzle, get it set up, and ready to run. Okay. So in order to do that, it's the exact same way. We're going to take our measurement, we're going to take our ruler and we're going to measure the face of the DOC or the SCR catalyst, determine our dimensions. Once we've got our dimensions, we're going to center that under the cross hair. Once it's centered under the cross hair, we'll lower that wash muzzle down, and we will start our process.Some DOCs and some SCRs catalysts are odd shaped. We have a DOC plate. You can see in the video. Our DOC plate will allow for an odd shaped side inlet DOC to sit straight like this particular SCR catalyst won't sit straight in the machine without having something to support it. So we're going to place that underneath the SCR catalyst. Now we'll center it up. We'll lower our wash nozzle and we'll start our cycle.
This particular filter measures 11 inches, so we're going to be five and a half inches on center. Measures five and a half inches on center, set it to the cross hairs. Lower the wash nozzle down half inch to three quarters of an inch away from the face of the substrate or the face of the filter, and we're ready to go. Shut the doors. Increase our filter size to 11 inches and start.
All right, so we've put this machine through its paces. Today we cleaned a light medium duty of DPF. We cleaned a heavy duty DPF, and we cleaned an SCR catalyst. At the end of the day, at the end of your work week, we want to make sure that this machine's ready to go for the following week. Number one, check your water. Make sure that the water level's topped off and everything's good to go. Also, we want to make sure that we have plenty of supplies so that we don't have downtime. Bags, pig material and surfactant are all key components to cleaning DPS with this machine. So we want to make sure that we have those in stock. If you're running law on supplies, you can always reach out to your local dealer for more.


Comments 0